top of page


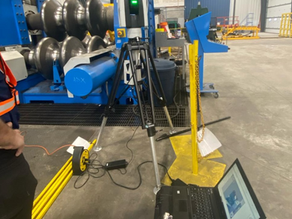
Robot Rail Alignment using Laser Tracking
SS Metrology Solutions has completed multiple robot rail alignment projects across North America , supporting a wide range of robotic and automated systems in manufacturing and inspection environments. These projects span new installations, system relocations, and performance optimization efforts, where alignment accuracy is critical to robot repeatability and long-term reliability. This representative project was executed using the Hexagon Leica ATS600 , selected for its abi
danieladebacker
Oct 30, 20251 min read


Precision Alignment with Hexagon Leica Absolute Tracker
High-precision alignment verification using the Hexagon Leica Absolute Tracker ensured accurate positioning and setup of large industrial machinery. Using the Hexagon Leica Absolute Tracker, we carried out precision alignment across large-scale equipment to confirm geometric accuracy and proper setup. The tracker’s real-time measurement capability allowed us to capture exact 3D coordinates and verify component positioning during installation and calibration. This process redu
danieladebacker
Oct 30, 20251 min read


Confined Space Scanning with Scanology NimbleTrack
Wireless 3D scanning with the Scanology NimbleTrack allows precise, safe data capture in tight and electrically active environments. In projects where space is restricted and safety is critical, adaptability and precision are essential. Using the Scanology NimbleTrack, we conducted high-accuracy 3D scanning in a confined area with live electrical components, capturing every necessary detail without physical contact. The system’s wireless, optical-tracking design made it possi
danieladebacker
Oct 30, 20251 min read


3D Modeling of Pool Facility with FARO Focus
High-resolution 3D scanning with the FARO Focus 3D captured detailed geometry of the pool facility for accurate digital modeling and renovation planning. Using the FARO Focus 3D laser scanner, we completed a full scan of the pool area to create a precise digital model for renovation and design integration. The scanner captured detailed measurements of architectural and structural elements, including walls, ceilings, and slide installations. The resulting point-cloud data prov
danieladebacker
Oct 30, 20251 min read


Marine 3D Scanning with Scanology TrackScan Sharp S
High-precision 3D scanning with the Scanology TrackScan Sharp S captured every contour of the vessel, from structural surfaces to intricate mounting details. Our team conducted a comprehensive 3D scan of the vessel using the Scanology TrackScan Sharp S, a high-accuracy optical tracking system ideal for large-scale marine applications. The scanner captured precise surface geometry, including railing positions, hull curvature, and structural features critical for fabrication an
danieladebacker
Oct 30, 20251 min read


Die Measurement with Scanology NimbleTrack- C
Using the Scanology NimbleTrack wireless 3D tracker, we performed high-precision die measurement and alignment verification with accuracy up to 0.025 mm. The Scanology NimbleTrack provided metrology-grade precision during on-site die inspection, enabling detailed geometric verification and CAD-to-part comparison. Its wireless optical tracking system allowed flexible scanning of large tooling surfaces while maintaining consistent measurement integrity. By capturing accurate 3D
danieladebacker
Oct 30, 20251 min read


Tooling Certification with Hexagon Leica Absolute Tracker
The Hexagon Leica Absolute Tracker enables precise tooling certification and dimensional verification across large manufacturing setups. Using the Hexagon Leica Absolute Tracker, our team performed high-accuracy tooling certification to verify geometry, alignment, and fixture compliance with engineering requirements. The tracker provides sub-millimetre accuracy for large-scale components, capturing 3D coordinate data to validate tooling integrity and ensure production readine
danieladebacker
Oct 30, 20251 min read


Precision Layout Alignment with Hexagon Laser Tracker
The Hexagon Laser Tracker provides precise layout alignment and coordinate verification for large-scale floor and equipment installations. Using the Hexagon Laser Tracker, our team established a high-accuracy reference grid to mark and verify critical layout points across the facility floor. Real-time coordinate measurement ensured accurate positioning of equipment, structural anchors, and production lines. This process reduced setup time, minimized alignment errors, and guar
danieladebacker
Oct 30, 20251 min read


Live Machining Alignment FARO Vantage Laser Tracker
Live-data dimensional alignment with the FARO Vantage Laser Tracker ensures critical tolerance control during machining operations. Using the FARO Vantage Laser Tracker, we monitor real-time positional data of large machine components and verify axis alignment as machining progresses. The tracker measures 3-D coordinates of reference targets, integrates live with CAD or machine-control systems, and enables rapid corrections that keep assemblies within tight fabrication tolera
danieladebacker
Oct 30, 20251 min read
bottom of page
